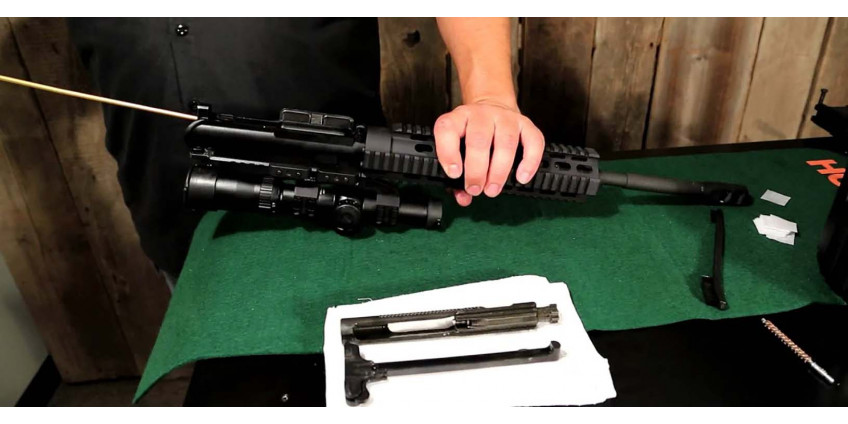
You bought an AR-15, spent an unforgettable couple of hours on training shooting, and returned home with a feeling of complete delight. But what to do next – wipe the weapon with a rag and carefully put it in the box until the next training shooting or hunting? No, first you should clean your rifle well. Weapons, like any mechanism, must be regularly cleaned, otherwise one day you would notice your rifle is not as obedient as before. In this article, we will explain to you how to clean the AR-15, disassemble and assemble it. In practice, this is much easier than you expected, believe us!
Step 1
The first surprise is that you need a simple bore brush. Such an accessory can be bought for $5. If you spend a little more time diving the Internet, you can find an even cheaper one.
If you are a newbie and don’t have any equipment or accessories for hunting or shooting, it is a good decision to buy a ready-made cleaning kit. Such a set will cost you $20. But we are not saying that you should buy a ready-made set because you can put together it by yourself. Usually such kits include too many useless specifically for your rifle things. Start your set with several versatile accessories and it will be enough.
Step 2
Your magazine should be empty and removed and the chamber must be empty too. Do not even think about starting cleaning if there is ammo left in the rifle. This must be done in the following sequence:
· Place the rifle on a flat area without pointing the barrel at yourself, people, or animals.
· Remove the magazine.
· Inspect chamber, there may be some bullets left.
Then place the rifle on the area prepared for cleaning. Put on old, unnecessary clothes that you can dirt and throw away. Also prepare a pair of gloves. In order not to buy gloves every time you clean your weapon, we recommend buying a large box at once. 100 pairs will cost you about $9.
Step 3
Let's move from words to action. Separate the upper receiver from the lower receiver, pus take-down pins out/ It can be a little bit tight, so you need to do it gently. Separate lower and upper parts. Nylon punch will help to clean them as safely as possible.
Step 4
Remove your charging handle and bolt carrier assembly. It is not difficult to do this, but for beginners, this particular step can be hard. The bolt carrier group is always the dirtiest element of the riffle. So take the rag and remove all spots of dirt. Then put the light coating of oil. There is no need to disassemble this part full especially if you are a newbie because there are a lot of small pieces that you can assemble incorrectly.
Look at the upper part chamber and wipe away all dirt. Black spots are hard to see, so just wipe the chamber with a clean rag.
Step 5
Clean the barrel. Just spray some cleaner inside of it and let it dry. Then you can take a punch or a mop and run it through the tube. Please note that you need to clean back to front, and not vice versa. It is very important. Remember, you must always clean the rifle from chamber to muzzle.
Step 6
Take the bolt carrier group and clean it up with a rag. Or you can use soft paper towels. Before starting the cleaning, we recommend preparing 3-4 clean rags. Drop some oil in all possible holes and lube the metallic parts.
Step 7
That's it, cleaning is over. You have done it and now you need to gather all the parts laid out on the cleaning area into one rifle. To do this, repeat all steps in reverse order, from step 6 to step 1. Remember to wipe each part with oil, but do not apply it too thickly. Your rifle should not stick to your hands or slip in the palm of your hand. Rather, on the contrary, each element should have a slight shine, and that's enough.
After assembly, you need to check if you did everything correctly. To do this, put the rifle on a flat area and pull the trigger. If it returns to its place, it means that you completed all the steps of the assembly correctly. If the trigger does not return to its position, then you have problems and must disassemble the rifle again.
The rifle should be cleaned regularly; during disassembly, check the condition of all parts. Do not forget to lubricate the parts of the rifle.
Conclusion
How often should the AR-15 be cleaned? Well, certainly not after every hunt. The maintenance schedule for each manufacturer is different, it is written in the documents, user manual, or on the manufacturer's website. Remember that lubrication will never be too much.
Never clean your weapon if you are short on time. You should have 1-1.5 hours for this procedure, and if you are doing it for the first time, then be ready to spend 2 or more hours. Be careful to follow the sequence of disassembly and assembly.
If you follow our recommendations and steps above, then from a hard and boring process, cleaning the AR-15 will turn into something like a surgical operation, in which you are an experienced doctor who finds the problems of the patient – a rifle.
